|
|
|
|
LIGHT SCANNING PHOTOMACROGRAPHY |
|
In photomacrography, the depth of field is reduced as the reproduction ratio increases and the photographer must resign himself to accept mainly unsharp pictures. Few manufacturers of photographic hardware have grappled with this problem so far. There are however several techniques, ignored even by specialists, to increase this depth of field. The technique developed in this article is called light scanning photomacrography. Simple in its principle, it requires much precision for successful results.
EXAMPLE BY PICTURES
|
|
|
without light scanning : To obtain a great depth of field, the aperture is here of f/22, diffraction appreciably deteriorates the definition and the depth of field remains insufficient all the same. |
|
without light scanning : By increasing aperture to f/5.6, the depth of field decreases. In the depth of field area the sharpness is good and diffraction is less significant. |
|
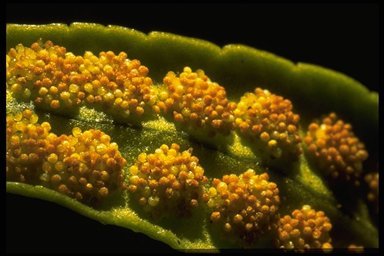
with light scanning : By preserving the aperture of f/5.6 and by using the technique of light scanning, one obtains a completely clear photograph with the benefit of an entirely sharp picture. |
A FEW OPTICS THEORIQUE : NUMERICAL APERTURE, RESOLUTION, DEPTH OF FIELD.
The numerical aperture u of a lens is the following quantity : u = n .sin(a) where n = refraction index of the medium in which are propagated the light rays (n = 1 in the air) a = maximum angle of the rays resulting from A (point from subject) Not to confuse numerical aperture and relative aperture, the latter being the focale/diameter ratio and corresponding to the figures engraved on the f/stop ring. Example for a 55mm focal lens set at f/8 with 82.5mm of the subject (for a reproduction ration G=2) : u = n.sina = 1x sin(2.39°) = 0.042
The resolution (or resolving power) can be calculated according to the following formula : Resolution = 0.6 x l / u (valid for well corrected lenses) where l is the wavelength of the light (in practice one can take l = 0.55µm). Example for the preceding case : Resolution = 0.6 x 0.55 / 0.042 = 8µm
The depth of field, in photomacrography, can be calculated in the following way : d.o.f. = 2Ne(1+G)/G² where G = reproduction ratio N = relative aperture e = diameter of the permissible circle of confusion (1/30 mm in 24x36) Example for the preceding case : d.o.f. = 2 x 8 x 0.033 x (1+2) / 2² = 0.4 mm
If the iris is stopped down, the depth of field increases but the resolution is degraded. Not always sensitive in general photography, this loss of resolution often becomes critical in photomacrography, especially at high reproduction ratios. The principle of scanning makes it possible to use the lens at its optimal aperture with the benefit of an entirely sharp picture.
PRINCIPLE
A plane of light thinner than the depth of field is placed in the focus plane. The subject is moved through this plane, parallel to the axis of the camera lens (shutter opened). The parts of the subject successivly enlightened, and sharp, are registered by the photographic emulsion and the unsharp parts, which are not enlightened, will not be in the final picture. The room where one operates must obviously be plunged in the darkness. This technique consequently requires lightsources generating the plane of light and a stage for moving the subject. This process offers an enormous potential since it also enters in the field of photomicrography, allowing very high reproduction ratios (more than 100x).
PRACTICAL
The following hardware can be used : The lightsource is a slides projector. In the slide carrier one puts a slide mount in which are assembled 2 razor blades to obtain a fine slit. Note that the condenser of the projector is designed to light an area of approximately 40x40mm and the slit has an area of about 3mm². Only 2 per thousand of the avalaible light is recovered. The lens of the projector may have a focal length from 50 to 80 mm. The width of the slit and the reproduction ratio of projection determine the thickness of the plane of light. It is necessary to stop down strongly the iris of the projection lens or else the light beam will expand too much on both sides of the projection focal plane.
The moving stage is constituted of a staight guide pushed by a screw. The motion speed controls the exposure which depends on :
Typically, with the hardware used, the speed motion of the subject varies between 1 and 10 mm per minute (for a 100 ISO emulsion). With only one projector the pictures are very contrasted and complex subjects cannot entirely be enlightened. These problems can be eliminated by using several suitably arranged projectors.
OPERATING
Once that all is well regulated, according to the provision indicated, the projector is switched on and the subject is placed in the plane of light. Then focusing is made (very precisely) : the plane of light and that of focus from now are confused. The subject is then moved just behind the plane, the shutter is opened and the moving stage is started. Once the subject is entirely scanned, the shutter is closed. The enemies, in this technique, are the vibrations and the parasitic movements. All the elements must be connected in a very rigid way. No need to operate on a tripod, this is the assured failure.
CONCLUSION
This technique, simple in its principle but delicate in its execution, is completely within the range of the patient and meticulous photographer. Realizable with homemade solutions (notice that a Californian company has marketed the idoine hardware since years), it allows to obtain inaccessible pictures in conventional photomacrography. The disadvantages related to this technique limit its sphere of activity :
Nevertherless, the applicability remains significant and varied, and the richness of the details shown by the pictures should allow this technique to find new adepts. |
|
|
|